
Most WiFi enabled devices (laptops, desktops, tablets, and smart phones) can connect to the Camplink network, sign-up for service and login. The basic steps are:
First try opening your web browser (e.g. Chrome, Firefox, Internet Explorer, Microsoft Edge, Safari, etc.) Do you see a screen like this?
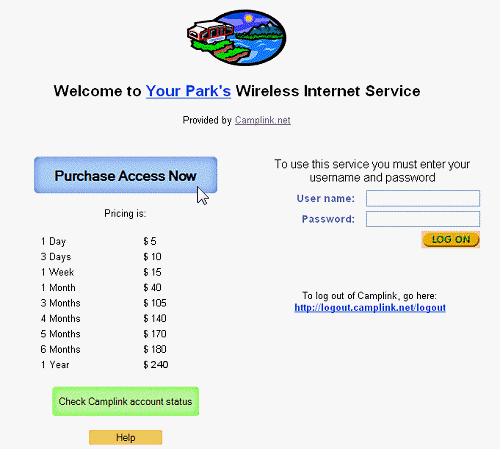
Then you're ready to sign-up! Click the "Purchase Access Now" button on the page, and fill out the forms including your desired access plan, username and password. Once you’ve signed up, return to this same page (sometimes closing and re-opening your web browser is the easiest way to do this), and then login to Camplink using the login information you just selected.
If you don't see the login page above, check your WiFi settings to make sure you're connected to a Camplink network. Click the appropriate system below to find out how:
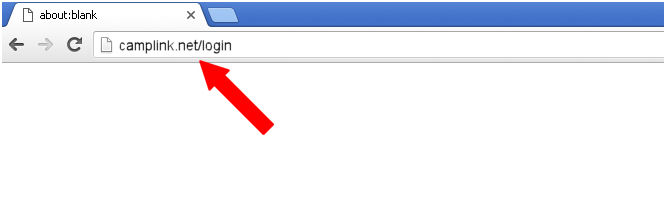
If you've successfully connected to the Camplink network and still can't load our login page, try visiting our login site by entering camplink.net/login in your web browser’s address bar (not search bar) as in the diagram below and hit {Enter} to see if the Camplink login page loads:
Still having trouble? See our support articles or contact us.
Click or tap the network icon from the system tray.

To access the list of available networks, move your cursor to the bottom right corner of the screen to open the tray icons. Click or tap the network settings icon.
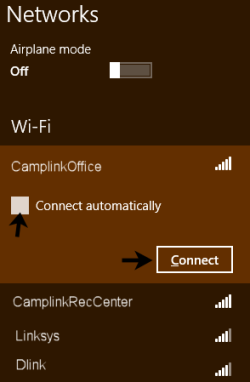
Locate any network with the word "Camplink" and click or tap on its name to connect. Select "Connect automatically" then click to "Connect".
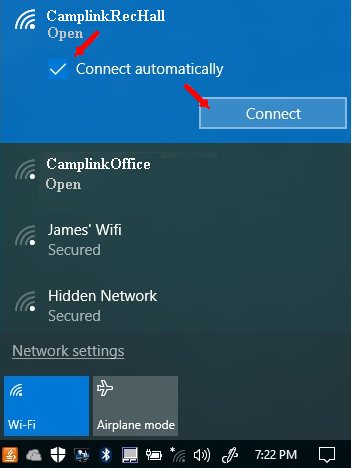
NOTE: The airplane mode slider at the bottom disables your WiFi. Make sure the Airplane mode is grayed out and the Wi-Fi mode is enabled.
Once it connects to Camplink, click the link for "Properties". Under "Random Hardware Addresses", make sure the option is "OFF". You may be prompted to reconnect to the network.
You should be able to get to our Camplink sign-up page. Click here to return to the top.
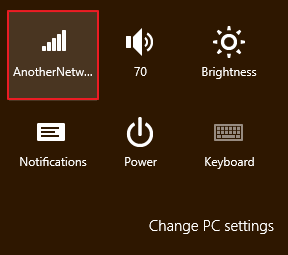
Click or tap the network icon from the system tray.

To access the list of available networks, move your cursor to the bottom right corner of the screen to open the charms. Click or tap "Settings" then "Network"
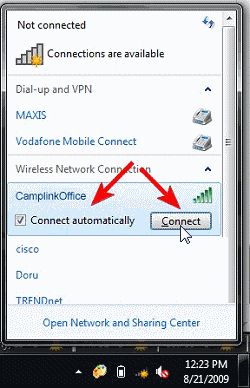
Locate any network with the word "Camplink" and click or tap on its name to connect. Select "Connect automatically" then click to "Connect".
NOTE: The airplane mode slider at the top of the list disables your wireless network adapter which will prevent your computer or device from attempting to connect to any networks. Make sure the Airplane mode is in the OFF position.
Once connected, you will be prompted to select sharing options. You should select "No".

Once you have successfully connected, the networking icon will change to depict the strength of your connection.

If you get a message like "This Network requires a Username and Password, Enter a Username or Password, or Open Your Web Browser?", select the option to "Open Your Web Browser". You should be able to get to our Camplink sign-up page. Click here to return to the top.
Locate the "Wireless Networks" tray icon on the lower right of your screen by the date and time. It may look like a group of signal bars  or a computer with a little pitchfork next to it
  . Left-click it once to bring up the network list screen. If you don't see the "Wireless Networks" tray icon, try clicking the "Start" button on the lower left and then click "Connect to", which may appear on the right side of the menu in the black section.
You should see a screen like the following, showing all the wireless networks that are in range. You may also see your computer dialup and local area connections on the top. If you don't see any wireless networks, look for the word "Wireless Networks" near the top of the list. If there's an arrow pointing down to the right of it, click the arrow so it points up and the wireless networks should appear:
If you see a message like this:
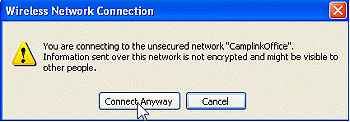
Click "Connect Anyway". In a few seconds it should show you connected. If not, try another Camplink network or check our Support section for common connection issues.
Now you should be bale to get our Camplink login page. Click here to return to the top.
Click the "AirPort" icon on your menu bar. You should see a list of available wireless networks in the dropdown menu.
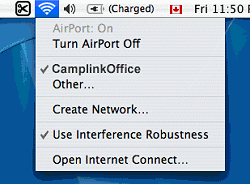
If the status shows "AirPort: Off", click the option to "Turn Airport On". If you don't see the "AirPort" icon, activate it in your network system preferences - see our support article "Where is my Mac AirPort icon?".
You should be able to get to our Camplink sign-up page. Click here to return to the top.
Different tablet and smartphone manufacturers use different methods for WiFi connections. On many models, you can “swipe down” from the home screen and tap the WiFi icon to enable/disable Wifi and see the list of networks.
On other models, go to Settings, WiFi or Setting, Connections to see the list of networks. Select the Camplink network with the most bars and connect. Once connected, set your phone to use its own MAC or Hardware address. See instructions for this here. Some models will then automatically open the Camplink login page. If that doesn’t happen, open your phone’s web browser and if you don’t see the login page, enter camplink.net/login in your browser’s address bar and it should load the login page. Click here to return to the top.